SIP Core & Cards
Now we have a PBX to connect to, we can install SIP Core and the cards.

SIP Core only works over HTTPS. This is required by modern browsers to access your microphone and camera. You can use something like DuckDNS or Let's Encrypt to enable HTTPS for your Home Assistant instance.
Installation
- HACS
- Manual
You can also click the badge to directly add SIP Core to HACS!
![]()
- Go to HACS in Home Assistant
- Click on Integrations
- Click on the three dots in the upper right corner and select Custom repositories
Add the repository URL:
https://github.com/TECH7Fox/sipcore-hass-integration
and set the category to Integration- Click Add and verify the repository appears
- You should now see SIP Core. Click INSTALL
- Restart Home Assistant
- Go to Settings → Devices & Services → Integrations and click Add Integration
- Search for SIP Core and follow the configuration prompts
- Download the latest release from GitHub
- Extract the
sip_corefolder to/config/custom_components/ - Restart Home Assistant
- Go to Settings → Devices & Services → Integrations and click Add Integration
- Search for SIP Core and follow the configuration prompts
Configure SIP Core
After installing SIP Core as an integration, you can configure it through the Home Assistant UI.
- Go to Settings → Devices & Services → Integrations
- Find and select the SIP Core integration
- Click on configure and enter your settings accordenly
- Save your configuration
You can find the Home Assistant usernames in Settings → People → Users.
For all available configuration options, see the Settings documentation.
Add the Card(s)
Now that SIP Core is configured, you can add cards to your dashboard to make and receive calls.
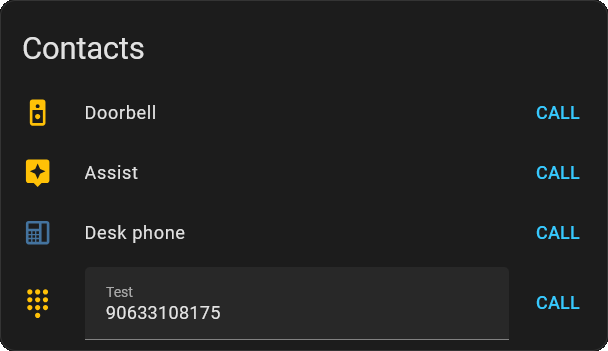
Contacts Card
The Contacts Card shows a list of SIP endpoints (extensions) and lets you call them with a single click.
type: custom:sip-contacts-card
extensions:
  "102":
    name: Jordy
    status_entity: binary_sensor.100_registered
    override_icon: mdi:account
  "103":
    name: Desk phone
    override_icon: mdi:deskphone
  "8001":
    name: Doorbell
    override_icon: mdi:doorbell-video
  "0612345678":
    name: Test
    override_icon: mdi:dialpad
    edit: true
debug: false
hide_me: false
state_color: true
See the Contacts Card documentation for all options and features.
Call Card (Optional)
The Call Card provides a full call interface directly in your dashboard, including call controls, video, and custom buttons.
type: custom:sip-call-card
extensions:
  "101":
    name: Jordy
  "102":
    name: Desk Phone
    override_icon: mdi:deskphone
  "8001":
    name: Doorbell
    camera_entity: camera.doorbell
buttons:
  - label: Open Door
    icon: mdi:door-open
    type: service_call
    data:
      domain: light
      service: toggle
      entity_id: light.bedroom_lights
  - label: DTMF 1
    icon: mdi:1
    type: dtmf
    data:
      dtmf: "1"

See the Call Card documentation for all options and features.
🛠️ Custom Cards
You can also create your own custom cards and popups to fit your needs.
See the developer documentation for guides and examples on building your own SIP Core components.
SSL
WSS (Secure WebSocket) requires SSL for security reasons. The add-on sets up Asterisk's part of that, but you may still need to set up your network to work with it.
- Ingress (Recommended)
- Manual
- DNS Rewrite
- Port Forwarding
Ingress is the easiest and most secure way to use SIP Core with the Asterisk add-on.
Home Assistant tunnels the WebSocket connection through its own secure connection, so you don't need to set up SSL or port forwarding in Asterisk.
- No need to open ports or manage certificates.
- Works out of the box with the add-on and SIP Core.
- Just use the default settings and let Home Assistant and SIP Core handle the rest.
If you use the Asterisk add-on, Ingress is enabled by default.
For technical details, see the developer docs.
You can temporarily accept the certificate manually by going to:
https://<YOUR-HA-ADDRESS>:8089/ws, click continue and accept. You should see Upgrade Required.
Now your browser accepts this certificate, even if the domain doesn't match.
This is only to temporarily test. This only works for a limited time and doesn't work for other devices.
This is not a permanent solution!It's possible to set a DNS rewrite in your router, so your certificate domain points towards your local IP.
This way you don't have to port forward anything, but this only works locally.
- Set up a DNS rewrite so your domain resolves to your Home Assistant's local IP.
- Your browser will trust the certificate if the domain matches.
You can find more info here.
The classic way is to port forward 8089.
Then you can set the server option to your domain.
You may also need to forward the RTP ports, which are by default 10000-20000.
If you do this, make sure you have secure passwords for your extensions! Bots may try to brute-force it.
If that happens often, you could set 8089 to another non-standard port.